Happy Christmas Eve! We made it safely to the mountains, and spent the day baking and playing. Now we await Santa and the snowstorm. The whale for E is one of the two handmade gifts I made this year- he was immediately in need of repair, as sewing old denim was a new trick for me (allow LOTS of seam allowance- very ravelly). I hope that he likes him!
Showing posts with label i made it. Show all posts
Friday, December 24, 2010
For My Record- A Handmade Something
Happy Christmas Eve! We made it safely to the mountains, and spent the day baking and playing. Now we await Santa and the snowstorm. The whale for E is one of the two handmade gifts I made this year- he was immediately in need of repair, as sewing old denim was a new trick for me (allow LOTS of seam allowance- very ravelly). I hope that he likes him!
Sunday, September 26, 2010
The Bat-Goat Hoodie and Hair News
First project completed from Elsie and Rachel's Small Craft class- well, the bear-ear-hoodie turned into a bat-ear hoodie, but they kind of look more like horns. Or goat ears at best. However, E died laughing when I showed it to him, and he wore it with pride to the grocery store today.
And I got the haircut. Not the safe one, but the really supershort one. I am surprisingly not hating it. I will try to post a picture this week.
Wednesday, October 21, 2009
So I Made These Pumpkins...
They're made of salt dough (recipe follows). And I wanted to make them into little charms for necklaces for goody bags for a Halloween Party. But, the holes I poked were lost when the little guys puffed up while baking. Didn't account for puffage.
So now, I have these... any suggestions? Game pieces? I know, bullets for a pumpkin gun, right? No time for crafting a pumpkin gun. Sorry.
Making salt dough is a super fun and forgiving craft(but clearly not the best choice for making jewelry).
Here's how it goes:
2 parts flour (2 cup)
1 part salt (1 cups)
1 part water (1 cup, add more if necessary)
optional 1 T. vegetable oil
Mix in a bowl, then knead on a floured surface until nice and elastic. Shape and sculpt. Bake on a cookie sheet in 250F oven for a couple of hours. Items must be small and not too thick or they would have to bake for a very long time.
Bear in mind- puffage.
Labels:
i made it,
playing+learning,
tutorial(ish)
Wednesday, October 14, 2009
Fall-ifying
arghhhhh....
I do not want to have one of those never posted to blogs. I am having a lot of trouble getting my layout+photos the way I want them. Blasted perfectionism. Nothing ever gets accomplished because it's not EXACTLY how I envision it.
blah, blah...
So, I think the secret to appreciating the changing of seasons is decorating. I've never been a knick-knacky kind of gal... but my collection(s) are getting completely out of control- time to put that junk (erm... treasure) to work. See above for first attempts at seasonal decor Hudkins-style. Thank you baby brother+mama for the Fall centerpiece kit. It's a little spare, but go easy- I'm a novice.
Friday, October 09, 2009
Back at Yellowhouse
So. I think I may have mentioned potty training a few months back. We took a bit of a break. But, we are back on the (potty) saddle again. This time armed with Jelly Bellies ("bluuuueones") and a sticker chart. We ran out of our freebie stickers, and I never made time to hit the dollar store, so I have (finally) found a use for the sticker making/laminating machine I found at the thrift store for $2 (!!!).
Labels:
i made it,
playing+learning,
yellowhouse
Friday, September 18, 2009
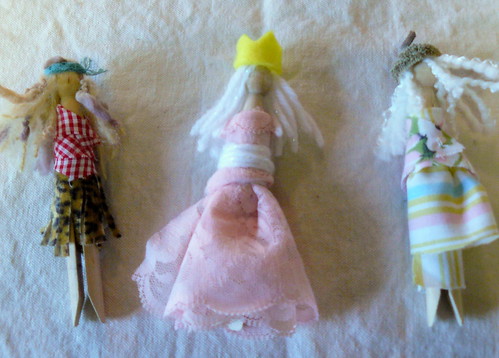
Meet the Princess
and her friends. Iliana was the unsuspecting victim of yet another homemade gift by Sunny.
There was a dvd, too- just to keep it a little normal. Well. It was Yo Gabba Gabba. Nothing normal there.
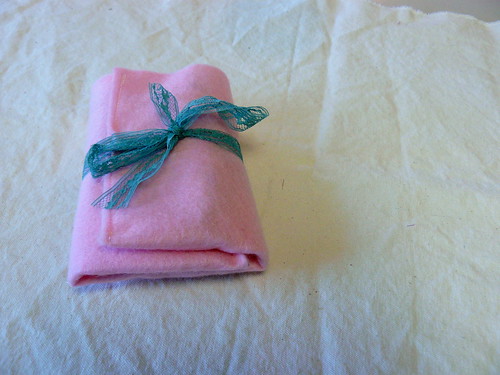
Clothespins, clear caulk, yarn and teeny scraps of fabric. Bedroll is made from one 9"x12" piece of felt, folded and sewn to create little bedding channels for the for the girls- with a scrap of hem tape (?) to tie. I enjoyed this process way more than I care to admit.
Friday, August 28, 2009
More Handmade-ness
Yet another homemade gift:
Soft baby rattles made from Ikea fabric.
Of course, you don't have to use Ikea fabric, I just didn't realize- in the heat of the crafty moment- that I did have a character design fabric in my stash already.
I saw this post (I feel like an index for the internet), and I had to make some. NOW! (the link referred to a tutorial, but I couldn't find one. I did however happen upon too, too many beautiful Dutch blogs. Hopefully this isn't too infringe-y, for the record- this is not my original idea.)
1. Loosely cut around chosen design.
2. Choose a coordinating fabric for the back- face right sides together and trim so both pieces are the same shape. These are small enough that I didn't have to pin them.
3. Sew on a machine using a straight stitch, leaving a 3/4" opening.
4. Turn right side out and stuff with polyfil or wool. I tucked a few little jingle bells in there.
5. Sew together the opening by hand, using very small tight stitches.
This is the exact same concept as making a pillow- except, tiny and with bells. Also- if you are going to make these- just do a bunch, as it seems babies come in waves! Also, if you are about to have a baby and you are reading this- just pretend like you didn't :) No surprises around here!
Ta Da! Easy to grasp softy rattle for your wee-est new friend.
Labels:
gifts to make,
i made it,
tutorial(ish)
Thursday, August 20, 2009
Why Can't I Just Buy A Target Gift Card and Make Everyone Happy?
I've been crafty.
And once again, against my better judgment.
Notes to self:
Measure twice, cut once.
Make a plan, stick to it.
Try to have a clue how to do what I am doing before doing it.
Oh well. Hopefully the lucky recipient will appreciate the wabi-sabiness of my efforts- or at least lie and say she loves it.
Just too stubborn to give up sewing and too cheap to take a class. Learning from my mistakes seems to be my school of choice!
Monday, June 01, 2009
The Boy With the Orange Shorts
Sorry for the crafty lull. It's not that I haven't been trying to make things, just most have ended up in the trash. It wouldn't hurt my success rate if I tried following the directions- just a little.
And on the second try- I made a pair of (functional) pajama shorts out of an old t-shirt for Edward. The first attempt yielded a pair of low-rise bell bottoms that looked like something designed for a toddler-sized Britney Spears doll. I took pictures- but they were truly inappropriate. The instructions came from my favorite craft/mama book. Ever. There are lots of online tutorials for these should you want to make a pair, too :)
Note the grey "buckle"- how I covered the slit made to insert elastic. I'm certain there are more professional ways to do this, but decided the wrestler belt effect in kind of endearing.
hmmmm... think it's time for haircut. Or barrettes.
Monday, May 18, 2009
Wednesday, April 08, 2009
EasterSugarColorSprout

Dying Easter eggs (felt like I was in over my head: 2+3+4 year olds + fragile little eggs- they did great, but I feel like I was wincing a lot)

Decorating Sugar Cookies
My mama made these for us to decorate, so sweet!

I made these little Easter baskets out of felt- from this tutorial. Unbelievably simple. I planned to put little chicks on there, but, alas, ran out of time. I think they were most pleased with the candy!
I didn't get a picture, but the garden is LOADED with sprouts. And speaking of sprouts- I just found this blog that maybe possibly has more photos of seedlings than I do. Nice!
Thursday, April 02, 2009
Wednesday: Lowbrow Toy Day
Refreshingly entertaining game: throw bean bags and pine cones into toy bin. Also, pine cones in empty swimming pool = manatee rescue party.
Plus more pics of kiddos playing in (magic) mud. We liked this way better than the plastic-y modeling clay. It is suspiciously similar in smell and appearance to regular old stoneware clay. Perhaps the magic is in the enjoyment kids get out of the most basic materials.
Subscribe to:
Posts (Atom)